Using Sigma metrics and Measurement Uncertainty in QC
The clinical laboratory demands quality above all else. Quality technicians, instruments, materials and supplies are all needed to maintain the integrity of results reported. However, while the clinical laboratory is an integral part of the healthcare sector, in recent years it has been the subject of significant funding cuts.
Often when resources are cut, quality is the first thing to be adversely affected. As there are no concrete rules for the frequency/stringency of running laboratory quality controls (QC), it is often an area in which laboratory directors may be tempted to limit their investment. They may be forced to consider reducing the frequency of their QC tests, as well as the stringency of their QC pass criteria, in order to save money.
However, carrying out fewer and less stringent QC tests increases the risk of misreporting patient test results, which would have enormous clinical, ethical, and financial implications.
Laboratory professionals are encouraged to think of creative ways of saving money by minimizing wastage and maximizing efficiency. There are many methods of improving efficiency. Two that are becoming increasingly popular due to their effectiveness are Six Sigma and Measurement Uncertainty.
What is Six Sigma?
Six Sigma is a method of process improvement that focuses on minimizing variability in process outputs. The model looks at the number of standard deviations (SD) or “sigmas” that fit within the quality specifications of the process. In the laboratory, the quality specifications relate to the Total Allowable Error (TEa). The higher the number of standard deviations that fit between these limits, the higher the sigma score and the more robust the process or method is. As sources of error or variation are removed from a process, the SD becomes smaller, and therefore the number of deviations that can fit between the allowable limits is greater, ultimately resulting in a higher sigma score.
A process with a sigma score of six is considered to be a high quality process, making six the target for many industries, including the clinical laboratory. In order to achieve Six Sigma, a process must not produce more than 3.4 defects per million opportunities. In a laboratory context, this would equate to 3.4 failed QC results per million QC runs.
Sigma is calculated using the following equation: Sigma = (TEa – %Bias) / %CV
TEa represents Total Allowable Error; %Bias means deviation from the target or peer group mean; and %CV means imprecision of the data.
Six Sigma’s value to the laboratory
Six Sigma can be used to help answer one of the most commonly asked questions in laboratory quality control: how often should I run QC? The Six Sigma model allows laboratories to evaluate the effectiveness of their current QC processes. Its most common use is to help implement a risk-based approach to QC, where an optimum QC frequency and multi-rule procedure can be based on the sigma score of the test in question. The performance of tests or methods with a high sigma score of six or more may be evaluated with one QC run (of each level) and a single 1:3s warning rule (reject if one result is outside 3 SD). On the other hand, tests or methods with a lower sigma score should be evaluated more frequently with multiple levels of QC, and a multi-rule strategy should be designed to increase identification of errors and reduce false rejections.
There is no “correct” way to run QC; however, Table 1, adapted from Westgard,1 recommends QC frequency, number of QC samples, and QC rules to implement based on current QC performance.
What is Measurement Uncertainty?
Measurement Uncertainty (MU) relates to the doubt that exists for the result of any measurement. For every measurement there is always a margin of doubt. As such, the clinical lab needs to ascertain the width of the margin and the significance of the doubt.
Two values are needed in order to quantify uncertainty: the width of the margin or interval, and the confidence level, which states how sure we are that the “true value” is within that margin. For example, if a piece of string measures 20cm, plus or minus 1cm at the 95 percent confidence interval, we say that we are 95 percent sure that the string is between 19cm and 21cm long.
In a hospital or healthcare environment, the clinician must be certain that any change identified in a patient’s test result is not due to the laboratory test system, but to a change in the patient’s status. This is especially critical at clinical decision levels.
Calculating MU using QC data
The first step in calculating Uncertainty is to look at intra-assay precision and the inter-assay precision of QC data. Intra-assay precision refers to measurement precision within a run. It is normally measured by running 20 or more replicates of the same sample at the same time. This process helps to identify any random uncertainties within a test system (instrument sampling errors, bubbles in pipettes, etc.). Inter-assay precision, on the other hand, refers to precision over a number of different runs. It is normally measured by running 20 or more replicates of the sample over several days (for example, run one replicate every day for 20 days) This process will identify any systematic uncertainties within the test system.
To measure Uncertainty (u), the lab must first calculate the Standard Error of the Mean (SEM) of the intra-assay precision (A) and the SD of the inter-assay precision (B). Once we have calculated A and B, we need to square them, add them, and calculate the square root (Figure 1):
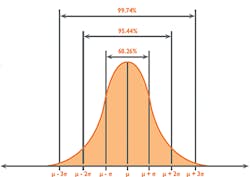
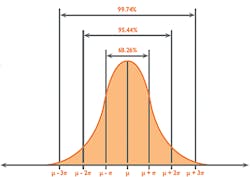
As Uncertainty is calculated as SD, and 1SD is equal to 68 percent confidence on the Gaussian curve (Figure 2), it is reasonable to multiply the Uncertainty by a coverage factor (K) of 2 to attain a 2SD confidence level of 95 percent. This is known as Expanded Uncertainty (U).
MU’s value to the laboratory
In addition to helping meet ISO 15189:2012 requirements, Measurement Uncertainty has a range of added benefits for the clinical laboratory:
- It provides quantitative evidence that measurement results adhere to the clinical requirements for reliability.
- It provides labs with an indication of potential sources of Uncertainty. Efforts can then be taken to reduce or eliminate these sources, thereby improving overall efficiency.
- It allows for accurate comparison of results with reference values using the same measurement procedure.
- It is an essential component for achieving standardized and harmonized measurement results through metrological traceability.
Conclusions and recommendations
Due to increasingly tight budgets, cost-cutting practices are becoming routine in the laboratory. Laboratory professionals need to utilize every available method of saving money in order to maintain high quality outputs while remaining within budget.
Six Sigma and Measurement Uncertainty can be used to increase efficiency in QC practices. Both of these statistical calculations, however, can involve time-consuming and labor-intensive data analysis. The ideal solution would be for labs to utilize a peer group program with automatic QC data upload and advanced statistics such as Six Sigma and Measurement Uncertainty calculated automatically.
REFERENCE
- Westgard JO, Westgard SA. Basic Quality Management Systems. Chapter 12.
Designing SQC procedures. Madison WI: Westgard QC, Inc., 2014.
Edward Hill, BSc, serves as QC Product Specialist for Randox Laboratories, provider of laboratory Quality Controls, peer group reporting software, and other diagnostic solutions for clinical, food/wine testing, veterinary, forensic, and molecular laboratories.


